The Face Rig
- ngreen46401
- Jan 18, 2024
- 5 min read
The First step in rigging is placing the joints, I started with the eyes and eyelids.

To achieve this, I first isolated the eye mesh so it was easier to deal with. I create a joint using the skeleton tab in the animation section of Maya's tools. (You can see below).

I then, snapped the joint (using V) to the center of the first eye and then moved it back and snapped it to the center of eye from a top view. This made sure the eye joint was fully center in the back middle of the eye.

To get the eyelids to work I had to take the eye joint, duplicate it twice (once for each eyelid) and move it up and down a small amount.
Next up was aligning the lip and jaw joints.
To start, I did the jaw which can be seen as the joint reaching towards the chin.
I then created the lip root joint just below the jaw root joint. This lip root joint is going to be duplicated so every lip joint has a different root, in the exact same position.

After this, I made the lips starting with the upper middle then duplicating and rotating down towards the lower lip. The rest of the lip joints were made the same way by duplicating and rotating to position them in the right place along the mouth. Once one side of the lips is done, we can use the mirror joints button to easier make the other side of the lip joints, and ensure they're symmetrical and following the same naming convention.


The rest of the joints were much easier to add. I added the cheek puffs, nose joints, squint, sneer, and eyebrows making sure the joints were positioned and orientated in a way that made it easier for the weight painting step later on. The main thing was to make sure the joints were positioned properly in the face so that they could be seen without x-ray but embedded far enough into the face so they were in a good place to effect the mesh. To get the position perfect I moved my own face in front of a camera and looked at what points had the most effect.


Here you can see how far I positioned the joints into the face.
On the right you can see the joint hierarchy with everything parented under the head.
With the joints placed the next step was to create and position the controls. I started with the jaw as it was simple to add at the start. I took a circle held right click and selected control vertex.

This gave me vectors to change the shape of the circle and mold it to suit my needs. I shaped it to nicely fit the jaw so that it could be easily grabbed if you needed to change the position during animating.


I also created a group and added it the jaw control to it. This meant I could effect the group and not mess with the control allowing for better control over the rig.

I also made sure to set the pivot point at the jaw route joint (by pressing insert and snapping with V to center of joint) so that the jaw would rotate from the correct place.

Finally I constrained it as a parent constraint so that the joint would 100% follow the control.

I followed up with creating the lip controls, this used the same process as the jaw except i had to do it more times for each of the lip joints. Originally I set the constraint as an aim constraint so that the joint would point at the control but not follow it. However I found this to not be very easy to work with so I opted to do a parent constraint as well as the jaw and create the aim effect during weight painting.

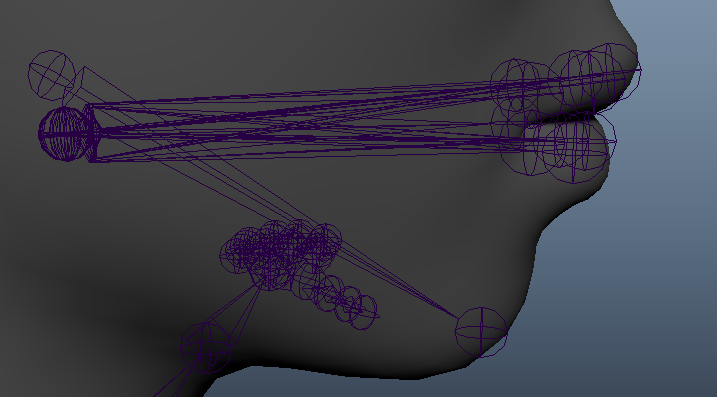
Moving along I created a eye control which was a lengthy process where i created the custom control (seen on the left) by using the EP Curve tool

Clicking the tool settings and setting it to 1 linear which made sure there were no curves in the custom control.

Next I created the circle control and positioned the center perfectly on the eye. I then aim constrained the control to the eye joint and clicked + until the translate tool gave me an accurate line to position the circle controls onto the custom control.

Now, move the eye controls outward so they align with the custom control, as seen in the custom control picture above.
In hindsight, this was not an effect way to position the eye controls as the eyes look a little wonky.
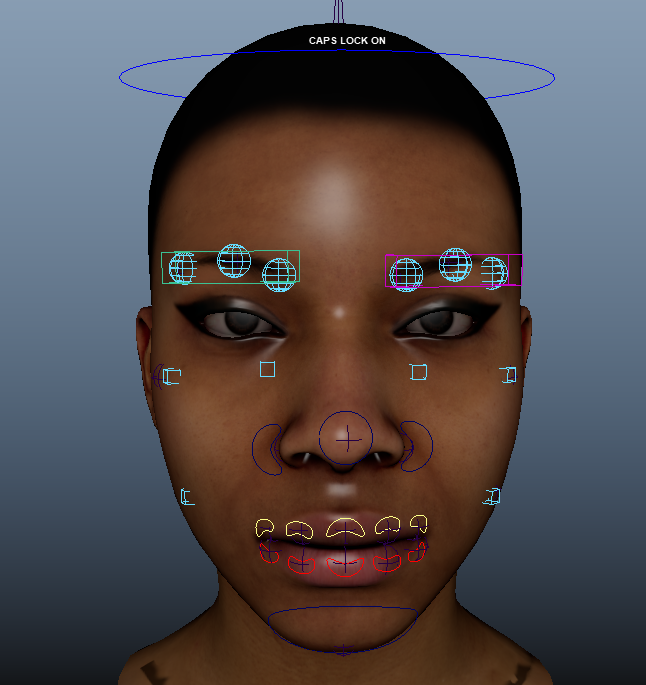
Finally, the rest of the controls are quite easy. Each control can be a simple circle, but as you can see on the right, I decided to make custom cube controls and a custom attribute to turn on and off the detail controls of the eyebrows.


Now we're onto weight painting.
On the left you can see how to access this menu. Note it will only show up if you're on the rigging tab.


This is the weight painting tool settings.
The top box shows all the joints connected to the mesh, whatever one is select is what you're currently weight painting. This is structured in the same way as the joint hierarchy.
Down in the brush settings, you have Replace, Add, Scale and Smooth. Along with the brush profiles, Opacity and Value.
Replace will change any weight value that is already there.
Add will add onto any weight value that is already there.
The other one that is important to use is Smooth, which will smooth out any hard edges.
Brush profiles are very simple and do essentially what they look like. I use the 2nd option for just about everything.
You can change the size of the brush by holding B and dragging the mouse.
Lastly, the Opacity and Value effect how much weight value is being added. I usually keep these low and use the Add function to slowly add weight over time.


A helpful tool is the hammer skin weights that's also found in the skin tab. If something is unaligned, if you hold right click and select all the vertexes, then hammer them, it should straighten them out.
I'm going to show some examples of my skin weights below. Note how the eyes are flooded, meaning they have full weight value.


Now that we're done with weight painting, I did the face shapes. I started this by creating a master controller to have all of my set driven keys in one place.
To add extra attributes, you select edit and add attribute.

This brings up the add attribute settings.
I changed the name and edited the numeric attribute properties. I keep the default as 0 (this will be the normal face), then I have maximum as 10 and minimum as -5.
The attributes that I added are: Smile, Sad, Angry, Shock and Cheek Puff.

Then, with the animation tab selected, I go into the key tab and set a set driven key.

This opens the set driven key settings.
From here, with the master control selected I click load driver. This means we can select our new attributes and set what they mean.
I then, selected all my face controls and clicked load driven. I then highlighted them all as well as all their translate and rotate values and pressed key to set the default 0 pose for all the new attributes.
From here, I changed the attributes to 10 and changed the face pose to resemble each corresponding face shape. Then, keyed each one so the attribute slider affected the correct face shape. I did same process for -5, but made the face shape go the opposite way to give myself some leeway.
Here are my face shapes:
Default

Smile


Sad


Angry


Shock


Cheek Puff


![MR REEEEBOOOOT [walking]](https://static.wixstatic.com/media/1e9107_033643e4b06e40b98182556fc973dacc~mv2.gif/v1/fill/w_980,h_540,al_c,usm_0.66_1.00_0.01,pstr/1e9107_033643e4b06e40b98182556fc973dacc~mv2.gif)
![MR REEEEBOOOOT [jump]](https://static.wixstatic.com/media/1e9107_53ac487cdd6e4f678c0a854f9ba5ec58~mv2.gif/v1/fill/w_980,h_539,al_c,usm_0.66_1.00_0.01,pstr/1e9107_53ac487cdd6e4f678c0a854f9ba5ec58~mv2.gif)
Comments